Christmas Craft Countdown Day 10: Reupholstered Settee Tutorial
*Today's guest blogger is my dear ol' roomie from college, Becca. She was the perfect first roommate to have, full of fun and enthusiasm! I wish we lived closer because she's always got some kind of creative project brewing. This settee is a gift to her daughter for Christmas and I'm already drooling over it. Read on and get inspired!*Martha
Okay, all. I am so excited. SO excited to be a guest blogger on InCircle Interiors. When I was approached about being featured during the DIY December I knew I wanted to do it. The problem was deciding what project to feature. Oh boy. Most of my Christmas decorations are homemade and old. I didn't know if I should talk about my wooden Santa, fabric pennants, wreath, card holder, embroidered wall hangings, painted wooden snowmen, or stuffed snowman family. The problem with all of those are they were made several years ago and kinda ho-hum. Then I remembered the SETTEE!
I scored this child-sized settee for $10 at a garage sale a few weeks ago.
My original plan was to repaint and reupholster it. But then with some persuasion from my husband and in-laws, I decided not to paint it. For a few reasons
1. The finish makes it look fancy
2. It matches some already existing furniture in my daughter's room.
3. It was way less work to leave it as-is.
So, recovering it was what I was going to do. The fabric looks okay in the before picture, but it was stained and stuff and I wanted to freshen it up a bit. I decided to use a more neutral fabric to increase its usability for years to come.
Enough with the jibber-jabber. Let's get started.
Supplies:
-Fabric and trim
-Scissors
-Needle-nose pliers
-Staple gun and staples
-Hammer
-Hot glue gun
I do have to say, I am not a professional reupholsterer, I am barely an amateur. I just kinda do what I do and it works. I will do my best to describe what is happening in these pictures.
Here's the before. I had removed the trim at this point but you get the idea.
 |
The first thing to do is remove the old fabric. Just use your brute strength to rip off what you can. |
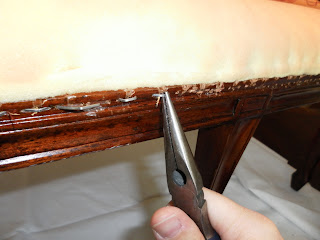
Then use your needle-nose pliers to remove the staples. I actually used a small screw driver to get the staples pried away from the wood a little bit.
Here is a handy video about removing staples...
 |
Once you have the fabric stapled on, cut off the excess fabric. |
 |
Now to prevent any fraying, use fray check on the unfinished edges. |
 |
Then, finish by hot gluing your trim around the edges. |
 |
| And you're done! |
Thanks for joining me for my very first tutorial.
*Thanks, Becca! Readers, remember we're posting through the weekend to make sure we squeeze in all 25 days of Christmas crafting! See you tomorrow!*


So beautiful, Becca! I'm so impressed! Reupholstering is such tedious work! Love the finished result---gorgeous!
ReplyDeleteBecca! It looks great!
ReplyDeletecat~
WOW, this turned out stunning! Such a great step by step tutorial!
ReplyDelete