Monday, December 27, 2010

Scentsy Giveaway WINNERS

The VERDICT is in...THANKS for all who entered our first giveaway (courtesy of WantWickless.com). Here are our winners.

Stephanie won a ROOM SPRAY

Christina won a SCENT CIRCLE

Tara won a SCENT CIRCLE

I hope everyone had a WONDERFUL Christmas and wish you all a Happy New Year!

Saturday, December 25, 2010

Merry Christmas!

Phew! We made it. It's here. Christmas Day. We hope you enjoyed the {almost} 25 days of decor and gift ideas. There are so many I know I'm  bookmarking for next year. Hopefully you are sitting back in your lovely homes, enjoying the crafty work of your bad self and enjoying one of the best things about the holidays ... food! In case you haven't had enough fattening wonders, here's the recipe for a staple chocolate goody around my mom's house every year. In fact, one of the first things I did when I got home was finish these up so I could start eating them. And while writing this I had three. Don't judge me. 


Elegant Chocolate Truffles


1.5 lb (about 4.5 cups) milk chocolate, melted (110 degrees F)
1 cup whipping cream
1.5 teaspoons vanilla


Line an 8-inch square baking pan with plastic wrap; set aside. Place melted chocolate in a medium-size bowl. In a 1-quart saucepan, scald cream. Remove from heat and let cool for 5 minutes. Stir in vanilla. Beat chocolate with an electric mixer. Stop mixer and pour cream in all at once over chocolate


Continue beating, cleaning sides and bottom of bowl several times with rubber scraper, until mixture is smooth and well-blended, about 1 - 2 minutes. If the mixture looks rough or "curdled," simply beat in a little more cream (doesn't need to be heated) until it smooths out. Pour into prepared pan and refrigerate 6 hours or until firm. Cut into 1-inch squares and serve immediately. Store in refrigerator. Makes 64 pieces.


Variations:


For mint truffles, add 5 drops oil of peppermint in place of vanilla
Can roll into balls and ...
- cover with cocoa powder (our favorite)
- roll in nuts or coconut or candy cane shards
- dip in bittersweet chocolate and top with sea salt

Recipe from Deseret News, December 1996


Happy Holidays, everyone! We'll see you back here in January!


*Martha


Friday, December 24, 2010

Using What You Have Christmas Decor

Christmas Craft Countdown Day 24: Use What You Have

*Say hello to Kristi, our guest blogger for this Christmas Eve! My sister met Kristi recently at a party at her home and told me all about her unique Christmas decor that she created using a lot of things she already had. Thanks so much for sharing, Kristi! I am logging these ideas away for next year .. and maybe even altering them for other upcoming holidays!* Martha


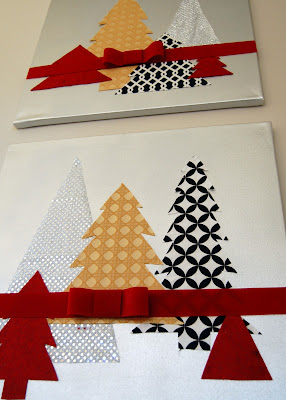
As time moves forward, my sense of style and design grows and improves (hopefully) and I love creating spaces in our home that reflect our current mood.  I found Christmas decor this year a little perplexing -- most of the decorations we have seemed out of place in our new home and I wanted to spruce things up a bit for under $5 (ha!).  Since the "bones" of our home are nuetral, I took down most of our decor and decided our Christmas palette would be red, silver, gold, black and white.  I made the artwork above using two 20x20 canvases that I spray painted with a metallic silver paint.  I then cut out various sizes and shapes of Christmas trees from fabric scrapes and attached them to the dried canvas with scrapbook glue dots. (Hot glue would work great too.)


I used red velvet ribbon to tie around and make a bow to add a final embellisment, then hung together for more impact.


Spray paint was my friend this year.  These letters used to be a distressed maroon color that I spray painted silver and displayed on our bookcase.


 I spent $3 at the Dollar Store on these silver balls and grouped them in a cake stand as a center piece.


I made a few Christmas tree shaped throw pillows and bought two red pillows at Target for $6 each to add a little Holiday cheer to our couches.


My little girl and I went to the woods and gathered branches that we brought home and -- you guessed it -- sprayed painted silver.  I grouped the silver branches on a ledge leading into our kitchen and added some greenery, berries and hung gold ornaments off the branches.


Thanks so much for letting me share a few things with you!  I get so much inspiration from looking at all the wonderful ideas everyone has out there.  Hugs and Merry Christmas!

Kristi

Thursday, December 23, 2010

Decorating Outside

Christmas Craft Countdown Day 23: Decorating Outside


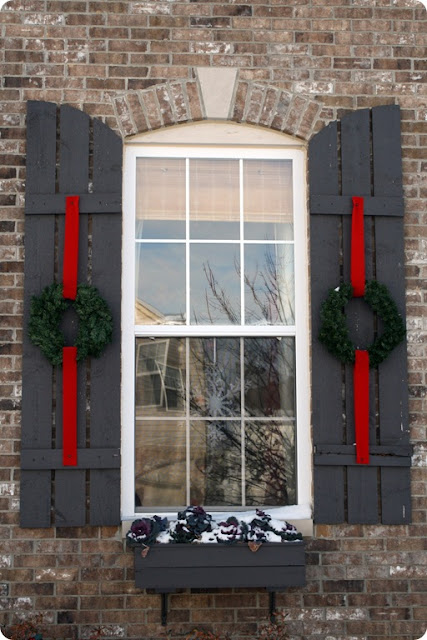
We're taking interiors to the exterior today. After all, the outside of your home should reflect the loveliness inside, no? When it comes to holiday decorating outside, I often think: lights. The end. Just lights. But there can be oh so much more happening outside. And I'm NOT talking about Blow-Up Santa. EEK. I thought Thrifty Decor Chick did an excellent job of showcasing her out-of-doors for Christmas, and true to her title, she did it frugally. 


I'll send you to her post for details on everything, but here are her photos to get you salivating...


It always helps to have snow around to boost Christmas ambiance.


*Martha

Sunday, December 19, 2010

Craft "to do" LIST

Day 19 (and 20...getting lazy ;): Craft "to do" list
I'm feeling in a funk trying to think of more crafts for our Christmas Craft Countdown (or I guess we have been counting up???) We tried contacting other bloggers to "Spotlight" them and there GREAT WORK but it is just a crazy busy time of year so not many have gotten back to us (which is totally fine). But now that we are at #19 our of 25 days of crafts...I am kind of regretting this idea. A blog post a day is hard for me...a non-blogger. To be completely honest...it is sometimes a CHORE for me to sit down and write. So today...I'm going to make a "To Do" list of all the crafts I would LOVE to find...I mean make time to do.
  • Wreaths - this is one of my favorite crafts to do because it is not too time consuming and you can finish it quickly. You know how some projects never seem to end or get finished...I know when I make a wreath I will be able to finish it (as long as I have my creative juices flowing). My goal is to make a wreath for EVERY Holiday! Here are a few that I have made so far: Thanksgiving/Fall (its a fun one to have up from (September - November)
My Halloween mummy inspired wreath (super easy all you need is a wreath form (I used hay), cheese cloth, and straight pins. I sprayed it with a little black spray paint to give it and aged look, and topped it with black ribbon)
  • Snowflake Blanket - last year I bought that pre-quilted fabric at Joann's and some binding (or is it called edging) tape, thinking "oh what a simple quick project, just sew the edging on and you have an instant blanket. One year later and it is still not done!
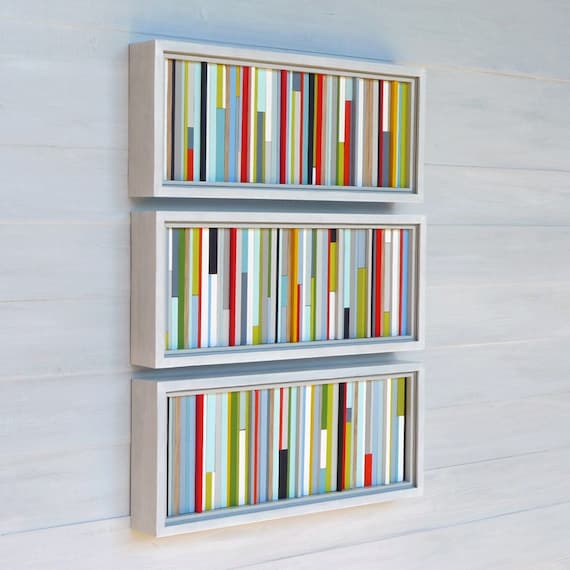
  • Paint Chip Wall Art - I have these large books of paint chip samples from an Interior Design firm I worded for when I was in school and I have always wanted to cut them up and layer them, and then frame it as art. Here is a picture of a similar idea by PaintSquare on Etsy (check out her shop it is amazing). She does it with painted wood pieces but it is a similar idea.
  • Quilt for my son - My Granny was an AMAZING quilter and hand quilted everything. My goal is to hand quilt ONE blanket in my life. I have started it about a year ago. Cut out all the squares, started sewing the rows, and that's as far as I have gotten. I still need to finish the top, put it together and then hand quilt it. SOMEDAY!
  • Granny Square blanket - (can you tell that I am obsessed with blankets yet?) My Grandma always made beautiful granny square blankets and taught all of her granddaughters how to do it...but did we ever do it NO! I have crocheted blankets before but always wanted to do the granny square. So one day I googled it and found a GREAT video on how to do it (because I totally forgot), and got started. I really enjoy making the squares but once I realized how much work it was going to be to stitch them all together I edited my plan to be one LARGE granny square in the center bordered by small granny squares. Picture from Craftzine
There are probably more things on my list...I just can't think of them right now.

Now I have shared my Crafting To Do List...what is on yours?

Peace OUT,

Cyndi

Saturday, December 18, 2010

Scentsy GIVEAWAY

Day 17...instead of a craft...lets GIVE a GIFT!
Today we are giving away some FREE Scentsy products!

If you have never heard of Scentsy they are wickless candle warmers (seen below) that use a light bulb to melt the wax instead of a flame. So they are SAFER, STRONGER, and LONGER lasting than traditional candles.

So today we are giving away some product from Scentsy's "Fragrance On The Go" collection of products. These are products that you can use around the house, in your car, in a closet, etc. without owning a Scentsy warmer. In essence if you have never experienced Scentsy this is your little TASTE of it.

We will be giving away Scent Circles and Room Sprays and the MORE people who enter the giveaway, the more items we will giveaway!
Here's how you enter to WIN:
Receive an additional entry in the giveaway for each item you complete.

1. MANDATORY! Head over to WantWickless.com and let me know your favorite Scent.
Sample comment: Spiced Grapefruit sounds YUMMY.

2. Become a FOLLOWER of InCircle Interiors.
Sample comment: I am a follower of ICI.

3. Become a Facebook Fan of Want Wickless and then comment on their wall saying you stopped by from ICI.
Sample comment: I am a facebook fan of Want Wickless under the name Jane Doe

4. Become a Facebook Fan of InCircle Interiors
Sample comment: I'm a Facebook Fan of ICI under the name Jane Doe

5. Blog, Facebook, Tweet about this giveaway. (leave a link and comment for each thing you do)
Sample comment: I blogged about this giveaway at janedoe.blogspot.com

6. Add the InCircle Interiors Button to your blog.
Sample comment: I added the ICI button to my blog at janedoe.blogspot.com

BONUS ENTRY: Receive FIVE extra entries if you place a Scentsy order from WantWickless throughout the duration of this giveaway. Be sure to come back and leave 5 comments saying you placed an order!
*Please leave a separate comment for each thing you do.*

Don't forget to leave your email so we can contact you!!

Good Luck!

Contest will end December 24th at 11:59 pm (PST)
Winner(s) will be announced December 25th, 2010 MERRY CHRISTMAS!

Friday, December 17, 2010

Day 17; Pom Pom Pillow

My wonderful friend Ashley Stock aka Little Miss Momma has some awesome tutorials that I want to share with you and give you a little challenge. Check out her tutorials on how to make a Pom Pom Neckles and Pom Pom Headband. THEN my challenge to you is to take those GREAT ideas and make it into a home decor item. Maybe put some on a pillow, make 3D wall art, a fun garland...what are your ideas???And if you LOVE Little Miss Momma's tutorials PLEASE "like" her Facebook page or "follow" her blog...she has GREAT stuff!

Peace out,
Cyndi

Thursday, December 16, 2010

Day 16: Paper Plaques

LOVE this quick craft that reuses some of your SCRAPS! I found it on the BHG website (wow you can definitely tell where I have been scouring for ideas to catch up). Anyway, I LOVE the look of this and it is a super quick and easy project.

Use those pretty bits and pieces of paper you can't bear to part with for this wall-art project. Local crafts stores carry inexpensive wood plaques in tons of shapes and sizes. Paint the plaques, cut the paper accordingly, and adhere (aka Mod Podge is our friend). Finish with a coat of polyurethane if desired.

Love love it! Plus you don't have to do and entire grouping like they did...even one, two, or three of these added to any grouping of art and/or photo's would be a GREAT addition.

Peace out,
Cyndi

Day 15: Button Stocking

Today's craft comes to us from this months Better Homes and Gardens magazine. There was a super fun article called "Cute as a Button" that had the adorable felt stocking and to top it off it has instructions on how to make it!!! I have always wanted to make my own stockings but also fear it a little...don't quite know why, maybe it is because my family is still growing and I don't know how big it will grow and I want to have matching (or complimentary) stockings. Oh the crazy dilemma we create in our heads.


Flowered Felt Stocking

Add a modern twist to a yuletide with bright blooms and buttons on a felt stocking.

Materials:
  • Bright red, dark red, white, aqua, and dark blue felt
  • White and aqua embroidery floss
  • Assorted buttons
  • 1/4-inch-wide red grosgrain ribbon

Instructions:

1. Pin a stocking shape cut from bright red felt on top of a larger piece of dark red felt. Sew together by machine-stitching side and bottom edges.

2. Trim dark red felt, leaving a 1/4-inch border along stitch line. With a running stitch and white embroidery floss, go over the machine stitching for hand-sewn detailing.

3. To create the largest flower, layer white-felt petal shapes on top of aqua felt and secure with aqua embroidery floss. Cut out a 2 1/4-inch dark blue felt circle and a 1 3/4-inch red felt circle. Notch the circle edges. Layer a white-felt circle on top of the notched circles and sew the petals to the three-layer flower center. Sew a doubled-up button through the flower center. Sew flower to stocking.

4. Make smaller two-ply flower shapes. Layer felt shapes and buttons and stitch to stocking. Sew small shank buttons directly to stocking for additional detail.

Or if you don't want to make the ENTIRE stocking try embellishing a store bought stocking. BHG gives a few idea's here.

Now if you decide to make this please show your love on the Better Homes and Garden's website...because we have to give credit where credit is due.

Peace out,

Cyndi

Wednesday, December 15, 2010

Day 14: Etsy find

OOPS got a little behind on our days...Martha was doing so well and the second it was my turn...we miss a post! Oh man I am bad at blogging.

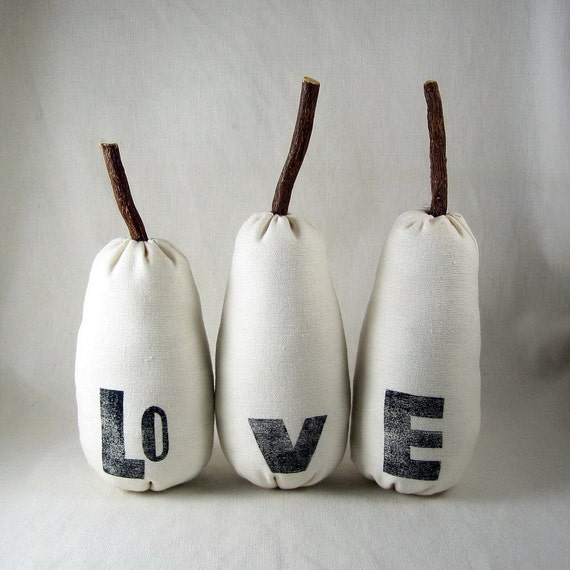
Here is an AMAZING product that I found on Etsy that I LOVE and is on my WISH LIST:


The Love Pears by La Pomme
She is from France and has some AMAZING vintage items too. Check her out!

Now to catch up on day 15...oh and 16 is a few hours away...ahhh!

Peace out for now,
Cyndi

Monday, December 13, 2010

Coffee Table Books for Design Lovers

Christmas Craft Countdown Day 13: Not a Craft, Just Gift Ideas

Interior Designer Jonathan Adler was on The Today Show this morning giving his recommendations for coffee table books to gift the design-lover in your life. I had an immediate lust for every one of these books, so I just had to share his suggestions (see the video here).


Of course, they mentioned his two new books, Happy Chic Accessorizing
and Happy Chic Colors. I heart Jonathan Adler because of those two words alone: accessorizing and colors. He does both very interestingly.


I've thumbed through The Selby is in Your Place at several book store visits and was just plain puzzled. Click on the link for a description that explains the weird-awesomeness.


American Fashion Designers at Home shows you just that.


The Apartment Therapy blog has been influential in changing the way I think about what I always assume to be our "temporary living standards." I'm beginning to think that our family may reside in small-ish spaces forever, so their Big Book of Small, Cool Spaces should become part of my collection.


*Martha

Sunday, December 12, 2010

Decorate Your Gifts

Christmas Craft Countdown Day 12: Decorate Your Gifts

For some of my tags this year, I made variations of red circles in a Power Point document, printed them on cardstock and cut them out to use for gift tags. That's just one of many ideas. Here are some tags and gift decorating ideas you can get online.

Download and print these for a dollar from Marta Writes


I've used these tags for a couple years. They are a free download from Inside a Black Apple. (And if you are looking for a unique gift for a little girl, check out her new paper dolls book. It looks delightful; I want one for myself!)

Easy to make  mitten tags


 Hello cinch! Take your fun paper scraps, scissors and your hole punch and you've got these tags.

I really like these simple Merry Christmas tags.

*Martha

Saturday, December 11, 2010

Pine Center Pieces

Christmas Craft Countdown Day 11: Pine Center Pieces

*Today's post comes from my friend, Krista, whom you can look to for advice and direction re: all things vintage. She has great style and great taste and is an all around nice person.*Martha


These Christmas centerpieces are cheap and really easy but add just enough festive spirit to any table. 

Supplies:
Glass Jars (various sizes) and the older the better
Twine
Potter soil
Spruce tree branches

Steps:

First, wrap the twine around the jars.  Feel free to make it as thick as you’d like.  I wrapped one jar just a few times and used a lot of twine on others.  Tie it off or use a hot glue gun to secure it to the jar.

Second, pour potter soil into the jar.  Pack the soil down until it fills roughly 2/3 of the jar.

Third, place your branches in the soil.  I used old branches I trimmed from my tree or you can go to a Christmas tree lot and ask for scrap branches they have.

Fourth, fill the rest of the jar with soil and you are finished!


I did a couple in various sizes and placed them all together.  Feel free to add pinecones or holly berries to give it an even more festive feel.  Enjoy!!
                                                  

Friday, December 10, 2010

Reupholstered Settee

Christmas Craft Countdown Day 10: Reupholstered Settee Tutorial

*Today's guest blogger is my dear ol' roomie from college, Becca. She was the perfect first roommate to have, full of fun and enthusiasm! I wish we lived closer because she's always got some kind of creative project brewing. This settee is a gift to her daughter for Christmas and I'm already drooling over it. Read on and get inspired!*Martha

Okay, all. I am so excited. SO excited to be a guest blogger on InCircle Interiors. When I was approached about being featured during the DIY December I knew I wanted to do it. The problem was deciding what project to feature. Oh boy. Most of my Christmas decorations are homemade and old. I didn't know if I should talk about my wooden Santa, fabric pennants, wreath, card holder, embroidered wall hangings, painted wooden snowmen, or stuffed snowman family. The problem with all of those are they were made several years ago and kinda ho-hum. Then I remembered the SETTEE!

I scored this child-sized settee for $10 at a garage sale a few weeks ago.
My original plan was to repaint and reupholster it. But then with some persuasion from my husband and in-laws, I decided not to paint it. For a few reasons 
1. The finish makes it look fancy 
2. It matches some already existing furniture in my daughter's room. 
3. It was way less work to leave it as-is. 
So, recovering it was what I was going to do. The fabric looks okay in the before picture, but it was stained and stuff and I wanted to freshen it up a bit. I decided to use a more neutral fabric to increase its usability for years to come. 

Enough with the jibber-jabber. Let's get started.

Supplies:
-Fabric and trim
-Scissors
-Needle-nose pliers
-Staple gun and staples
-Hammer
-Hot glue gun

I do have to say, I am not a professional reupholsterer, I am barely an amateur. I just kinda do what I do and it works. I will do my best to describe what is happening in these pictures.


 Here's the before. I had removed the trim at this point but you get the idea.


The first thing to do is remove the old fabric. Just use your brute strength to rip off what you can.


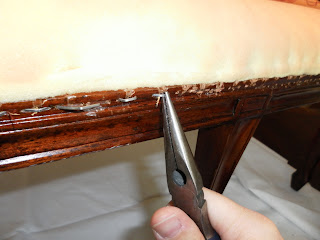
Then use your needle-nose pliers to remove the staples. I actually used a small screw driver to get the staples pried away from the wood a little bit.

Here is a handy video about removing staples...


Then get to work stapling on the new fabric. First you want to line the fabric right side against the wood and upside down. This is on the front of the settee and you will be flipping this fabric over after you staple it on, thus hiding the staples. Comprender?

 
Use a hammer to secure the staples.


Smooth the fabric over the seat. Then using the nearest writing utensil, mark and trim the fabric to make it fit around the back and arms of the chair. Continue stapling the fabric on the chair. (On the sides and the back you don't have to worry about your staples being exposed because they will eventually be covered with trim.)


Once you have the fabric stapled on, cut off the excess fabric.

Now to prevent any fraying, use fray check on the unfinished edges.
Then, finish by hot gluing your trim around the edges.
And you're done!


 Thanks for joining me for my very first tutorial.

*Thanks, Becca! Readers, remember we're posting through the weekend to make sure we squeeze in all 25 days of Christmas crafting! See you tomorrow!*

Related Posts Plugin for WordPress, Blogger...