Showing posts with label Tutorial. Show all posts

Wednesday, March 30, 2011

Chevron Desk Re-Do

Ok so I finally FINISHED my desk re-do that I talked about HERE a few weeks ago. And I'm super excited about it. So I only used 4 items to give a $30 Walmart desk a new lease on life (honestly the desk is really is a piece of junk that we have had for 5 years and were ready to throw away).

 So HERE is the list of items you need:
  • Primer (I started to prime but then realized my furniture was light enough in color that I didn't need to)
  • Colored Spray Paint (or if you prefer a paint brush you can definitely go that route)
  • Fabric (I found this AWESOME Chevron pattern fabric from FabricGuru.com)
  • Mod-Podge
  • Clear Spray Paint Sealer
 So here is what the desk looked like before...with my little midget being a dare devil and playing on it. (You can see he thinks he is pretty cool)
 So as you can see I started to prime but realized I didn't really need to on this particular piece. 

So when do you need to use primer? If it is a DARK piece of of furniture and trying to cover it with a lighter color (which I needed to do for a roll top desk I spray painted and it still bugs me when I look at it). Another reason to prime is because the primer is used to make the top paint stick better and have better coloring. You can also use the primer to save you a step, if you are like me and are too lazy to sand down the gloss finish just prime it and that will help.
 WOW don't I look lovely with my hair all disheveled in my husbands In N Out shirt?! AWESOME!
 So I just sprayed the base and left the top.
 Then I cut my fabric to the right size.
 Then it was time to BUST OUT the Mod-Podge!
 So I put the mod-podge on the desk first and started with just a few inches on the table so I could get the fabric lined up the way I wanted it and stuck it down.
 So I go the top all stuck down from the bottom...then I mod-podged over the top of the fabric.
 Make sure and make it even with your paint brush.
 This was the little shelf but wanted to show you that I did hospital corners on all of the corners.
Once you get the top mod-podged down you need to do all the sides and corners. Once the Mod-Podge had dried completely I spray a clear coat of a sealer and let it dry. DONE! 

It was a little bit of a process but in the long run it was a pretty easy project. I didn't totally time myself but I would say TOTAL it was maybe 3-4 hours of work time (of course there is time in between for drying).


And here is the FINAL PRODUCT I love it. it is a fun place for me to sit and write THIS BLOG POST! (while watching the Nate Berkus Show)

Happy CRAFTING!

Peace OUT!
Cyndi

PS As I'm about to post this I learned something new on Nate Berkus show...did you know they have "Reflective Spray Paint" that is like an INSTANT mirror? IT IS SO COOL!!!  I know what I'm buying next time I'm at Lowe's.

Sunday, March 20, 2011

Rocking Chair Re-Do

 So, I'm not finished with my desk yet (can't find my Mod-Podge), BUT I did finish a smaller project. I refinished a kids rocking chair that I got at a garage sale for $6. So here is the quick and easy tutorial.
 All you need is spray paint primer and a color of your choice...and of course something to refinish! Here is my cute little rocking chair that my son LOVES. Ironically I had/have a rocker just like this that was mine when I was little, but I didn't want to refinish mine because it has sentimental value.

 You know the drill...Prime it first...let it dry...then spray away with your color....get every nook and cranny

I'm so happy with the finished product. The color is called "new avocado" so it is a yellow/green...think of a vintage avocado stove top. I'm excited to have it in my living room...and my son loves to play on it.

Peace Out,
Cyndi

Monday, February 21, 2011

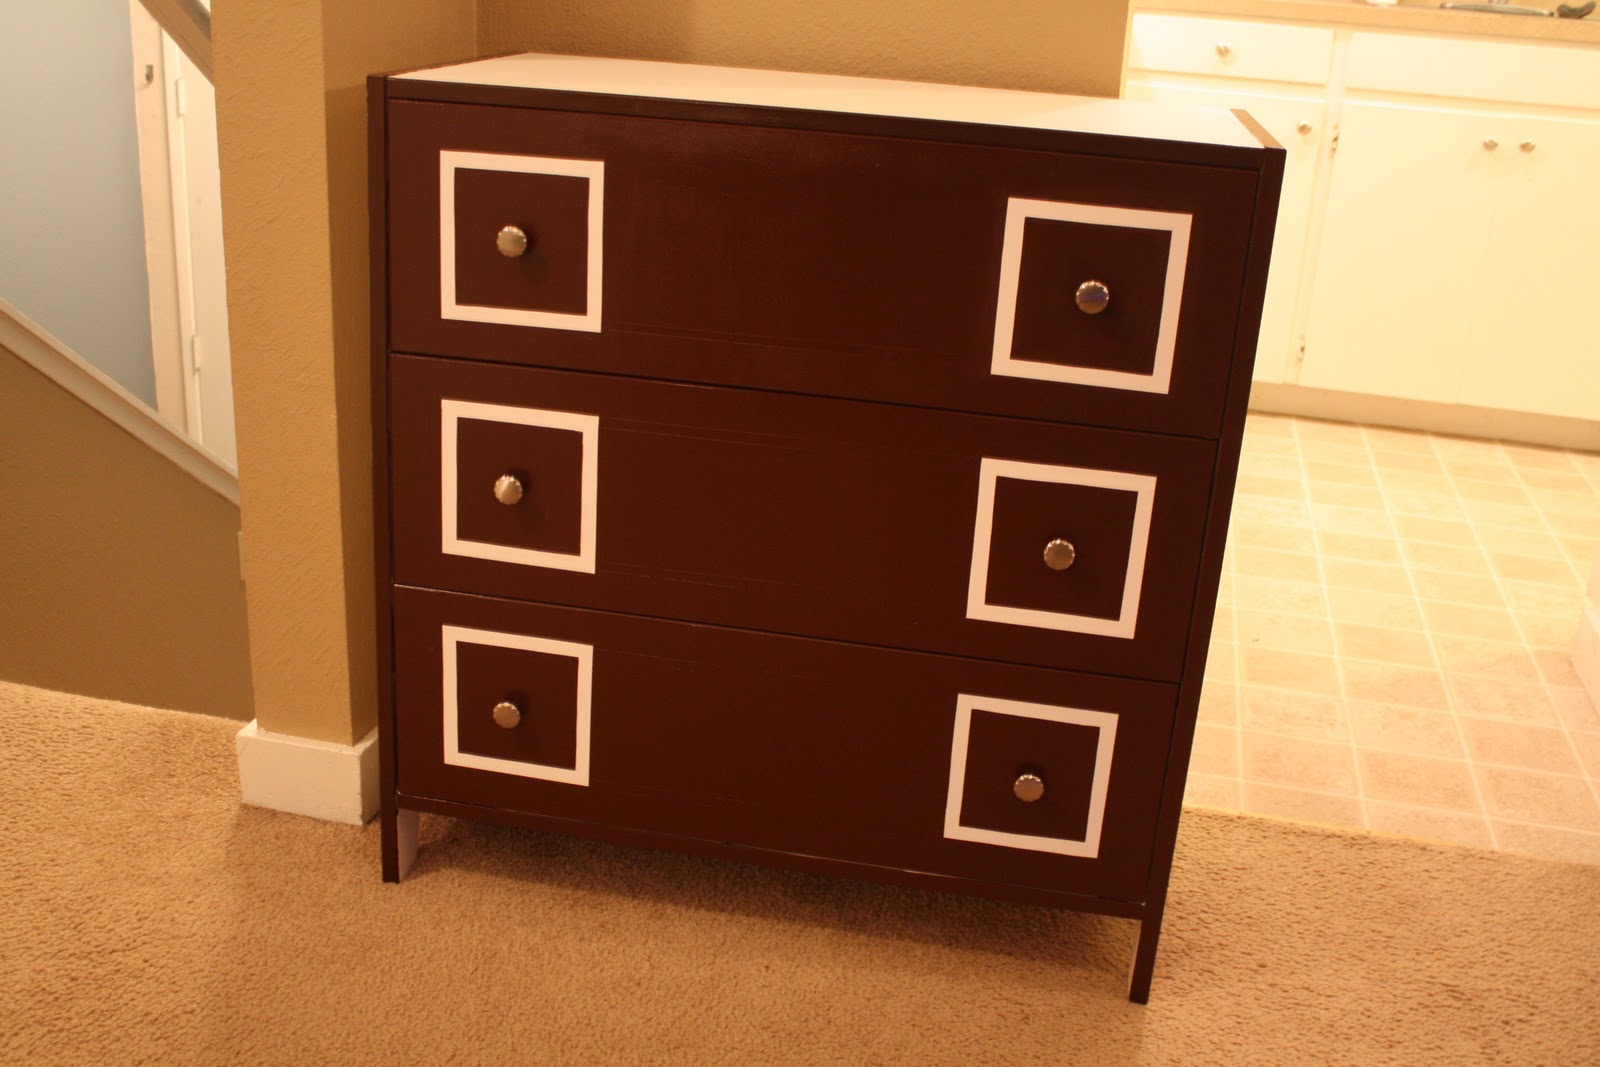
Finished Nursery Dresser and Tutorial


After some agony, I finally finished the dresser/changing table that will go in my boy/girl nursery. Here's how it all went down.

I sanded the dresser with 220 grade sandpaper. It's laminate wood and I sanded until it looked like it had some rawness and would be able to grip some paint. It didn't ever get as raw as I wanted it to. Laminate wood = lame wood. I really hate that crap.


I used Valspar Gloss Buckeye Brown and Eggshell White paints.


I removed the knobs and painted the whole thing white just to start with a blank slate.


The drawers didn't come out of this dresser. Curses! I won't make that mistake again. It made all the painting so much more frustrating. I had to bend and twist and stand on my head. After painting white, I used blue painter's tape so I could paint brown trim. I also had a hair-brained idea to use the tape as a stencil to paint a thin, brown rectangle on the front of the drawers.


That didn't go so well. The brown bled through and the edges were not so stellar. I really liked the idea, but my execution was pretty pathetic. And I couldn't bear to try and clean it up. Believe me, if you looked close, you'd see tons of fuzziness that would be a nightmare to try to make straight again.


So, I bagged it and painted the whole front brown without any idea as to what I'd do after that. I put on my new knobs and had a good think.


I couldn't deal with paint anymore, so I turned to white card stock and Mod Podge. I measured 6" x 6" squares and used an X-acto knife to cut out the centers.


I poured a puddle of Mod Podge and got out another foam brush.


I Mod Podged the squares on the front of the dresser, just eyeballing where I wanted them to be.


Initially, I thought I'd just do squares around the knobs.


But then I decided to add squares down the middle, too.


Tah-dah!

I am really psyched about how it turned out. I actually like the three squares better than the rectangle idea I was initially going with. It really makes a statement and every time I see it I'm taken aback by how cool it is. In fact just this morning I was in my daughter's bedroom at the lovely hour of 4 a.m. and was shocked by it yet again and had enough brain cells awake to say to myself, "that thing is so freaking cool I can't even stand it." Now isn't this the perfect time to reflect on the life lesson learned here? Sometimes you have to take the long, hard road to get to a better place. Painting projects are not my thing; I don't enjoy them at all. But this one, I'd say, was worth it.


P.S. We still have our GIVEAWAY going on...don't forget to enter.

Monday, February 14, 2011

Dresser Progress

Happy Valentine's Day! I would not have remembered today was the day except for all the other blog posts on the subject. My husband and I were fighting nasty sicknesses all weekend and are not spreading any kind of love so it's a good thing we celebrated a couple weekends ago with a little trip to the symphony. I think we'll celebrate early every year - bypass all the pressure leading up to the day, plus flowers were cheaper, and I've been enjoying them even up to today!

I will tell you what HAS been getting a lot of lovin'. This nursery dresser! It has been a labor of love - sanding, many coats of paint, waiting for each to dry, taping it up for the trim painting. The thing that's made it extra complicated is the fact that the drawers don't come all the way out!


Poor thing looks like it's in the hospital with all those bandages.


After maybe one more coat of brown in a couple places, the tape comes off and the new knobs go on in the next couple days. Check back later this week for the final look and more details on the process.

*Martha

Friday, December 10, 2010

Reupholstered Settee

Christmas Craft Countdown Day 10: Reupholstered Settee Tutorial

*Today's guest blogger is my dear ol' roomie from college, Becca. She was the perfect first roommate to have, full of fun and enthusiasm! I wish we lived closer because she's always got some kind of creative project brewing. This settee is a gift to her daughter for Christmas and I'm already drooling over it. Read on and get inspired!*Martha

Okay, all. I am so excited. SO excited to be a guest blogger on InCircle Interiors. When I was approached about being featured during the DIY December I knew I wanted to do it. The problem was deciding what project to feature. Oh boy. Most of my Christmas decorations are homemade and old. I didn't know if I should talk about my wooden Santa, fabric pennants, wreath, card holder, embroidered wall hangings, painted wooden snowmen, or stuffed snowman family. The problem with all of those are they were made several years ago and kinda ho-hum. Then I remembered the SETTEE!

I scored this child-sized settee for $10 at a garage sale a few weeks ago.
My original plan was to repaint and reupholster it. But then with some persuasion from my husband and in-laws, I decided not to paint it. For a few reasons 
1. The finish makes it look fancy 
2. It matches some already existing furniture in my daughter's room. 
3. It was way less work to leave it as-is. 
So, recovering it was what I was going to do. The fabric looks okay in the before picture, but it was stained and stuff and I wanted to freshen it up a bit. I decided to use a more neutral fabric to increase its usability for years to come. 

Enough with the jibber-jabber. Let's get started.

Supplies:
-Fabric and trim
-Scissors
-Needle-nose pliers
-Staple gun and staples
-Hammer
-Hot glue gun

I do have to say, I am not a professional reupholsterer, I am barely an amateur. I just kinda do what I do and it works. I will do my best to describe what is happening in these pictures.


 Here's the before. I had removed the trim at this point but you get the idea.


The first thing to do is remove the old fabric. Just use your brute strength to rip off what you can.


Then use your needle-nose pliers to remove the staples. I actually used a small screw driver to get the staples pried away from the wood a little bit.

Here is a handy video about removing staples...


Then get to work stapling on the new fabric. First you want to line the fabric right side against the wood and upside down. This is on the front of the settee and you will be flipping this fabric over after you staple it on, thus hiding the staples. Comprender?

 
Use a hammer to secure the staples.


Smooth the fabric over the seat. Then using the nearest writing utensil, mark and trim the fabric to make it fit around the back and arms of the chair. Continue stapling the fabric on the chair. (On the sides and the back you don't have to worry about your staples being exposed because they will eventually be covered with trim.)


Once you have the fabric stapled on, cut off the excess fabric.

Now to prevent any fraying, use fray check on the unfinished edges.
Then, finish by hot gluing your trim around the edges.
And you're done!


 Thanks for joining me for my very first tutorial.

*Thanks, Becca! Readers, remember we're posting through the weekend to make sure we squeeze in all 25 days of Christmas crafting! See you tomorrow!*

Related Posts Plugin for WordPress, Blogger...