Phew! We made it. It's here. Christmas Day. We hope you enjoyed the {almost} 25 days of decor and gift ideas. There are so many I know I'm bookmarking for next year. Hopefully you are sitting back in your lovely homes, enjoying the crafty work of your bad self and enjoying one of the best things about the holidays ... food! In case you haven't had enough fattening wonders, here's the recipe for a staple chocolate goody around my mom's house every year. In fact, one of the first things I did when I got home was finish these up so I could start eating them. And while writing this I had three. Don't judge me.
Elegant Chocolate Truffles
1.5 lb (about 4.5 cups) milk chocolate, melted (110 degrees F)
1 cup whipping cream
1.5 teaspoons vanilla
Line an 8-inch square baking pan with plastic wrap; set aside. Place melted chocolate in a medium-size bowl. In a 1-quart saucepan, scald cream. Remove from heat and let cool for 5 minutes. Stir in vanilla. Beat chocolate with an electric mixer. Stop mixer and pour cream in all at once over chocolate
Continue beating, cleaning sides and bottom of bowl several times with rubber scraper, until mixture is smooth and well-blended, about 1 - 2 minutes. If the mixture looks rough or "curdled," simply beat in a little more cream (doesn't need to be heated) until it smooths out. Pour into prepared pan and refrigerate 6 hours or until firm. Cut into 1-inch squares and serve immediately. Store in refrigerator. Makes 64 pieces.
Variations:
For mint truffles, add 5 drops oil of peppermint in place of vanilla
Can roll into balls and ...
- cover with cocoa powder (our favorite)
- roll in nuts or coconut or candy cane shards
- dip in bittersweet chocolate and top with sea salt
Recipe from Deseret News, December 1996
Happy Holidays, everyone! We'll see you back here in January!
*Martha
Showing posts with label Christmas. Show all posts
Saturday, December 25, 2010
Friday, December 24, 2010
Using What You Have Christmas Decor
Christmas Craft Countdown Day 24: Use What You Have
*Say hello to Kristi, our guest blogger for this Christmas Eve! My sister met Kristi recently at a party at her home and told me all about her unique Christmas decor that she created using a lot of things she already had. Thanks so much for sharing, Kristi! I am logging these ideas away for next year .. and maybe even altering them for other upcoming holidays!* Martha
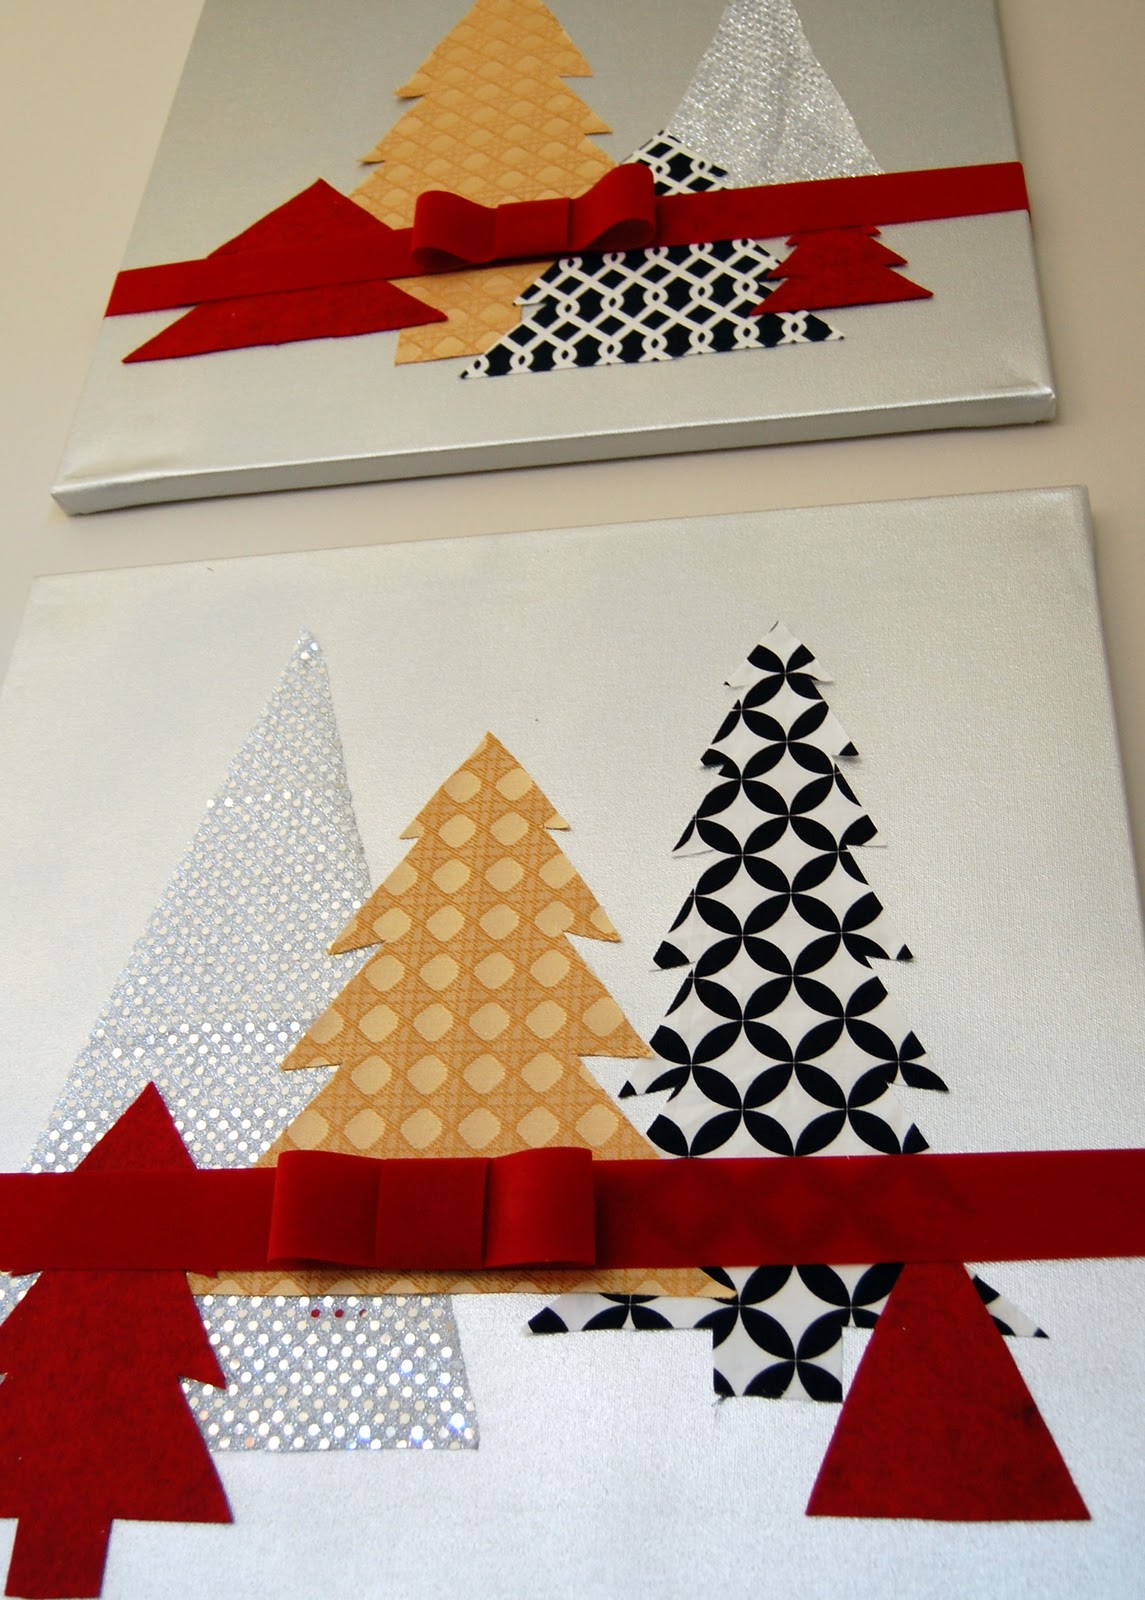
As time moves forward, my sense of style and design grows and improves (hopefully) and I love creating spaces in our home that reflect our current mood. I found Christmas decor this year a little perplexing -- most of the decorations we have seemed out of place in our new home and I wanted to spruce things up a bit for under $5 (ha!). Since the "bones" of our home are nuetral, I took down most of our decor and decided our Christmas palette would be red, silver, gold, black and white. I made the artwork above using two 20x20 canvases that I spray painted with a metallic silver paint. I then cut out various sizes and shapes of Christmas trees from fabric scrapes and attached them to the dried canvas with scrapbook glue dots. (Hot glue would work great too.)
I used red velvet ribbon to tie around and make a bow to add a final embellisment, then hung together for more impact.
Spray paint was my friend this year. These letters used to be a distressed maroon color that I spray painted silver and displayed on our bookcase.
I spent $3 at the Dollar Store on these silver balls and grouped them in a cake stand as a center piece.
I made a few Christmas tree shaped throw pillows and bought two red pillows at Target for $6 each to add a little Holiday cheer to our couches.
My little girl and I went to the woods and gathered branches that we brought home and -- you guessed it -- sprayed painted silver. I grouped the silver branches on a ledge leading into our kitchen and added some greenery, berries and hung gold ornaments off the branches.
Thanks so much for letting me share a few things with you! I get so much inspiration from looking at all the wonderful ideas everyone has out there. Hugs and Merry Christmas!
Kristi
Thursday, December 23, 2010
Decorating Outside
Christmas Craft Countdown Day 23: Decorating Outside
We're taking interiors to the exterior today. After all, the outside of your home should reflect the loveliness inside, no? When it comes to holiday decorating outside, I often think: lights. The end. Just lights. But there can be oh so much more happening outside. And I'm NOT talking about Blow-Up Santa. EEK. I thought Thrifty Decor Chick did an excellent job of showcasing her out-of-doors for Christmas, and true to her title, she did it frugally.
I'll send you to her post for details on everything, but here are her photos to get you salivating...
It always helps to have snow around to boost Christmas ambiance.
*Martha
Sunday, December 12, 2010
Decorate Your Gifts
Christmas Craft Countdown Day 12: Decorate Your Gifts
For some of my tags this year, I made variations of red circles in a Power Point document, printed them on cardstock and cut them out to use for gift tags. That's just one of many ideas. Here are some tags and gift decorating ideas you can get online.
Download and print these for a dollar from Marta Writes
I've used these tags for a couple years. They are a free download from Inside a Black Apple. (And if you are looking for a unique gift for a little girl, check out her new paper dolls book. It looks delightful; I want one for myself!)
Easy to make mitten tags
Print these speech bubble adhesive tags
I really like these simple Merry Christmas tags.
*Martha
Saturday, December 11, 2010
Pine Center Pieces
Christmas Craft Countdown Day 11: Pine Center Pieces
*Today's post comes from my friend, Krista, whom you can look to for advice and direction re: all things vintage. She has great style and great taste and is an all around nice person.*Martha
These Christmas centerpieces are cheap and really easy but add just enough festive spirit to any table.
Supplies:
Glass Jars (various sizes) and the older the better
Twine
Potter soil
Spruce tree branches
Steps:
First, wrap the twine around the jars. Feel free to make it as thick as you’d like. I wrapped one jar just a few times and used a lot of twine on others. Tie it off or use a hot glue gun to secure it to the jar.
Second, pour potter soil into the jar. Pack the soil down until it fills roughly 2/3 of the jar.
Third, place your branches in the soil. I used old branches I trimmed from my tree or you can go to a Christmas tree lot and ask for scrap branches they have.
Fourth, fill the rest of the jar with soil and you are finished!
I did a couple in various sizes and placed them all together. Feel free to add pinecones or holly berries to give it an even more festive feel. Enjoy!!
Thursday, December 9, 2010
Whimsical Felt Animal Ornaments
Christmas Craft Countdown Day 9: Whimsical Felt Animal Ornaments Tutorial
*Today's tutorial comes from my good friend since high school, Miriam. You can check out more of her sewing and crafting genius at her website Mad Mim. She just launched a beautiful ebook, How to Sew a Garden, with detailed instructions, pictures and video on creating tons of fabric flowers.*Martha
I’ll begin by saying that this craft is a complete swipe from my sister, Eirene (who originally swiped it (sort of) from Anthropologie). Actually, I believe the snail is the only true knock-off, and then from there she designed the other ornaments in the same style. I can only take credit (with her permission) for drawing up the designs and making these felt animal templates, and of course making these for my own Christmas enjoyment; my versions are only different in color and maybe slightly different in embellishment here and there.
There. Credit where credit is due. I am capable of coming up with a good Christmas craft on my own, but this year all my creative energy has been focused on my new (and so awesome!) fabric flower tutorial ebook: How to Sew a Garden, which you should definitely check out. My poor mind has been on creative overdrive for months now coming up with fresh, unique, and beautiful fabric flower projects that everything (even Christmas!) has become an afterthought. Luckily for me though, these beautiful felt animal ornaments breathed vibrancy into me and my Christmas tree!
I bought nothing to make these ornaments, and hopefully you won’t either (or at least much!) The supplies you’ll need to root around your craft supply for are:
-scraps of craft felt. If you’re fresh out, be consoled in the fact that you could by a lifetime supply and still only spend like 5 bucks.
-scraps (and I means scraps) of fabric to embellish with. Bright, medium scale flower prints work best.
-embroidery floss and needles
-heatbond (ok, unless you’re pretty crafty, you might have to buy some of that)
-medium heavy fusible interfacing
-ribbon
-beads/sequins for embellishment if so desired
Choose what little critter you want to make, and then choose what colors you want he/she to be: for any elements of the design that layer on top of the base design apply heatbond to (according to package directions). Cut out the felt animal template, and trace onto your felt. I found that it worked best to cut the template up as I cut the parts of the design that layer over the base shape.
With your heatbond applied (if you didn’t do it before, do it now), you can now iron it all together and are ready to embellish.
Use bits of fabric (also applied with heatbond) embroidery floss, beads and sequins . With all my ornaments I started with a blanket stitch around the entire outside, and then did whatever I felt like from there. See the photos for a reference.
After you finish making and embellishing these guys (which if you’re smart you’ll begin in July, because they are rather time-consuming), you’re almost done. Simply sew a loop of ribbon to the back using several whip stitches (be careful to not poke through the front side). To find the perfect hanging point I stuck my needle in the animal where I thought the ribbon should go, and allowed it to hang and balance; adjust the point accordingly.
And finally, trace around each ornament onto your medium-heavy interfacing, and apply to the backs in order to stabilize and cover up all unsightly knots and stitching.
Tuesday, December 7, 2010
Think Outside the Box
Christmas Craft Countdown Day 8: Think Outside the Box
Here are some interesting, different ways to add some spice to your home this season.
Maybe it's because rain boots are now a normal part of my life since I moved to Seattle, but I saw this idea and immediately loved it. A couple possibilities come to mind. You could use rain boots instead of stockings, use them in addition to stockings or simply fill them with empty, adorably wrapped gift boxes for looks. This would brighten an entryway perfectly.
This banister decoration is so simple and sweet, literally. Tie cute mugs to the rails with colorful ribbons and fill with lovely candies for guests to grab as they're walking by. I love a good, surprising candy stop!
This is a pretty genius idea and would even look cool in front of a big window, since that's likely where a curtain rod from which to hang the fabric loops would be. Then grab a big, sturdy branch, paint it white, and hang those socks!
{above 3 photos from House to Home}
Another unorthodox shoe idea . Sorry we just missed the date, but apparently December 6th is St. Nick's day and there's a German tradition in which you put out your shoes to be filled with treats overnight. More on that cute custom from Marta Writes.
I've always found the mistletoe a bit wimpy looking, hanging from the ceiling all sad and lonely, just waiting for someone to come stand underneath and put on a show. That's why I love this alternative: the kissing ball. So much more substantial and festive looking. I'd stand under that thing and give someone a show!
This banister decoration is so bright and fun. It's paper wedding bells. You know, the ones that would look tacky at an actual wedding. They are actually a delightful way to serenade your kiddies as they bound down the stairs to see what Santa has brought.
If you want to get fluffy and froofy and just a big goofy, try feathers! Actually, if I saw these in your house, I would NOT think goofy. I'd think RADICAL!
Finally, why not save a tree and think inside the box by making a Christmas tree out of presents? Who says your presents have to go UNDER the tree, you know? Just stack them around your house as decor, and then clean up is as easy as unwrapping them and disposing of everything as you normally would. Booyah.
*Martha
Whimsical Sweater Stockings
Christmas Countdown Craft Day 7: Whimsical Sweater Stockings
*Today's post comes my new friend, Cherie, whom I met during the Thanksgiving holiday in Oregon. She took me on the most incredible antique shopping trip one day and was constantly spouting out ideas about items we found that she was sure she could figure out how to make on her own. These are the kinds of friends we all need to keep in our back pocket. She told me about this sweater stocking idea and the minute I got home, I shoved everything aside and couldn't concentrate on anything else besides making my own. Here's how hers turned out. *Martha
Hi there, readers. As Martha mentioned, I love turning expensive ideas into cheap, DIY projects for my kids and me. These sweater stockings turned out to be so much more personal and unique than any I could have bought from a store. I hope you enjoy them!
Supplies:
- Old sweaters (from Goodwill)
- Embellishments (ribbon, lace, buttons, brooches, etc.)
- Sewing machine (or the will to hand sew)
- Scissors
Now let's get started!
1) Cut out a stocking template, trace a stocking you have, draw one, etc. You can find a template here if you don't want to improvise. I messed around a lot with patterns, making some toes more "elfish," some are short, some are long and skinny like knee socks. 2) Pin the template to your sweater and cut around it generously. 3) Sew right sides together then hem the edges of the top of the stocking. |
If you want a more finished top, use the sleeve cuff of the sweater as the top of your stocking. |
Happy Holidays! |
Subscribe to:
Posts (Atom)